banner_image

How To Create A Basic Granny Square - UK Terms

Whether you're brand new to crochet or just starting to explore new techniques, this guide is here to help you make your very first granny square—a timeless and versatile pattern loved by crocheters around the world.


Granny squares are more than just a beginner-friendly project—they're creative building blocks you can turn into blankets, clothes, bags, and so much more. In this document, you’ll find clear instructions, helpful tips, and visuals to guide you through each step with confidence.


Take your time, enjoy the process, and remember: every expert crocheter once made their very first square too. You’ve got this!

Click here for the pattern to be in US Terms

What is a Granny Square?

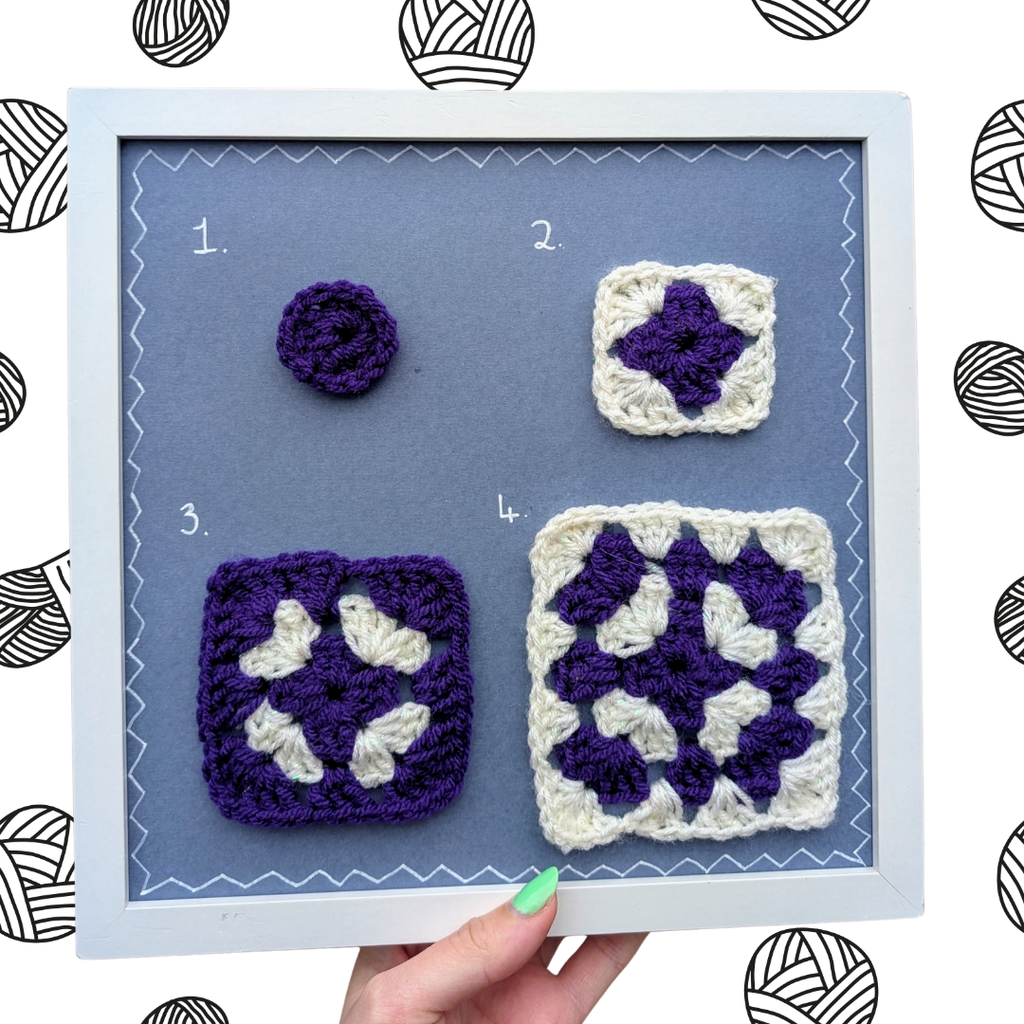
A granny square is a classic crochet motif made by working in rounds from the center outward, usually forming a square shape with repeating stitch patterns—often using double crochet clusters and chain spaces. It’s a popular, beginner-friendly project that can be used on its own or joined with others to create blankets, bags, garments, and more.

Granny Square Projects:

• Blankets & Throws – Join multiple squares for cosy home decor.

• Cushion Covers – Brighten up your space with colourful granny cushions.

• Tote Bags & Pouches – Stylish and functional.

• Clothing – Cardigans, vests, tops, and even skirts made from joined squares.

• Scarves & Cowls – Use rectangular arrangements for wearable warmth.

• Coasters & Placemats – Great for small, quick projects.

• Wall Hangings – Add a boho or vintage touch to your decor.

• Bucket Hats – Trendy and fun with lots of colour potential.

🎉 Your First Granny Square – You’ve Got This! 🧶

Today, you’re not just picking up yarn and a hook—you’re picking up potential. That little square you’re about to make? It’s the start of something bigger. It’s a skill, a hobby, a quiet joy that’s all yours.


Your first granny square might not be perfect, and guess what? That’s perfect. Because every great crocheter started with a first wonky square—and then made a hundred more. Every stitch you make is a step forward. Every mistake is a lesson. And every loop is proof that you can do this.

So take a deep breath, trust your hands, and let the yarn move with you. You’re creating something from nothing—and that’s kind of magic. 💫

Now go on—make that first square. You've already started by showing up.

✨ Step-by-Step Instructions of a Granny Square:

Be kind to yourself, take your time, and most importantly—don’t forget to have fun along the way. I can help you every step of the way, it’s what I'm here for 😊

1. Start with a slip knot and chain 4.

• Slip stitch into the first chain to form a ring.

2. Round 1:

• Chain 3 (counts as your first treble crochet).

• Make 2 treble crochets into the ring, then chain 2 (this forms your first corner).

• (3 treble crochets, chain 2) into the ring three more times.

• Slip stitch to the top of your starting chain-3 to close the round.

→ You should have 4 groups of 3 treble crochets, each separated by chain-2 corners.

3. Round 2:

• Change your yarn colour ( ask for the ‘How to Change Your Yarn Colour’ document from me if you don’t know how to! )

• Chain 3 (counts as your first tr), then make 2 treble crochets, chain 2, 3 treble crochets all in the corner.

• In each remaining corner space, so three more: (3 tr, ch 2, 3 tr).

• Slip stitch to the top of the starting chain to close.

4. Round 3 and beyond:

• Continue the same pattern, working (3 tr, ch 2, 3 tr) into each corner, and (3 tr) into each side space (between clusters).

💡 Tips:

• You can change colours between rounds for a multicolour effect.

• Keep your tension even and count stitches to avoid wobbly squares.


banner_image

Don't forget you can refer to this picture to help you!

If you have any queries or want to show me your creations, please don't hesitate to contact me ☺️

Shopping Cart

    Your cart is empty